

Online Image to Tajima Embroidery Conversion: Quick & Reliable
If you’re looking for a fast and professional way to convert images to embroidery for Tajima, you’re definitely not alone. Whether you run a custom apparel shop, manage a commercial embroidery setup, or simply need a clean DST file for your Tajima machine, online conversion services are now the go-to solution. They save time, reduce errors, and ensure your designs stitch out smoothly even when starting from basic JPG, PNG, or even AI artwork.
In this complete guide, we’ll walk through how online Tajima conversion works, what makes a digitized design high-quality, and how to get flawless embroidery files every single time.
What Is Tajima Embroidery File Conversion?
Tajima machines use a stitch-based format (most commonly DST) that tells the embroidery machine exactly how to move, stitch, trim, and color-change. But most artwork files like JPG, PNG, PDF, SVG, or AI are pixel-based or vector-based graphics that embroidery machines cannot read directly.
This is where Tajima conversion comes in.
Converting an image to a Tajima embroidery file is a process where a digitizer manually recreates your design using stitches, assigning:
- stitch types
- stitch lengths
- densities
- underlay
- pathing
- color changes
- trims
- pull-compensation
It’s not a simple “save as” button, it's an art and a technical skill combined.
Why Online Tajima Conversion Is Becoming So Popular
Online conversion services have changed the game. Instead of waiting days or struggling with complicated software, you can simply upload your image and get a professional Tajima file within hours.
Here’s why online services are booming:
Fast Turnaround Times
Most online digitizers offer same-day or next-day delivery.
Affordable Pricing
Digitizing has become much more cost-effective thanks to online competition.
Easy Upload Process
You just submit your artwork and pick your machine format.
Compatible for All Apparel Types
Whether it’s caps, jackets, polos, bags, or patches online services adjust the stitching accordingly.
Why You Need Professional Digitizing for Tajima Machines
Tajima machines are known for precision and high output, but they only perform as well as the digitized file you feed them.
Poor digitizing leads to:
- thread breaks
- excessive trimming
- wrong pull direction
- distorted shapes
- rough edges
- uneven density
- misalignment in fills or satin columns
A skilled digitizer does the opposite they set up the file exactly how Tajima machines prefer stitching.
Key features of quality Tajima digitizing:
1. Clean Pathing and Flow
The needle path must be optimized for efficiency and minimal thread breaks.
2. Proper Underlay
The correct underlay stabilizes the design before the top stitches are placed.
3. Controlled Stitch Density
Too much density = thread breaks
Too little density = gaps in the design
A good digitizer finds the perfect balance.
4. Push and Pull Compensation
Fabric stretches, pulls, and shifts. Proper digitizing accounts for this.
5. Stitch Type Selection
- Satin
- Fill
- Running
- Zig-zag
- 3D Puff setup
Each part of the artwork gets a stitch type based on size and details.
Which Image Types Can Be Converted to Tajima Files?
The good news: nearly any image format can be digitized. The quality of your final Tajima file is influenced by how clear your original artwork is, but digitizers can work with:
- JPG
- PNG
- SVG
- EPS
- AI
- TIFF
High-quality artwork produces better embroidery.
But even low-quality images or hand-drawn sketches can be digitized with some cleanup.
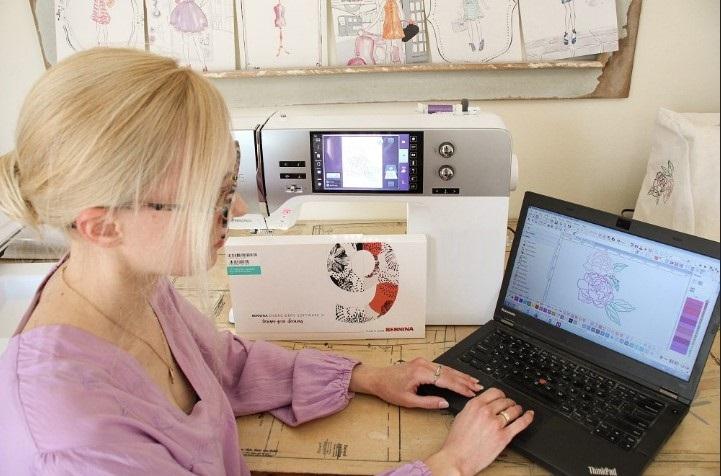
How to Convert an Image to a Tajima Embroidery File
Here’s a simplified step-by-step flow of how the entire process works:
Step 1: Upload Your Image
Choose your artwork file and submit it through a digitizing service’s online form.
Step 2: Describe Your Requirements
Details help the digitizer meet your expectations:
- Design size
- Fabric type
- Placement (left chest, cap, jacket back, etc.)
- Color preferences
- 3D puff or flat embroidery
- Special instructions (fine detail, thickness, etc.)
Step 3: Digitizer Creates the Tajima Stitch File
A skilled digitizer manually builds the design in software like:
- Wilcom
- Pulse
- Hatch
- Embrilliance
They assign pathing, density, trims, color changes, underlay, and stitch types.
Step 4: File Is Exported in Tajima Format
Most commonly, the file is exported as:
- DST (standard Tajima format)
- DSB
- TBF (less common)
DST is accepted by all Tajima embroidery machines.
Step 5: Test Sew (Optional but Recommended)
A professional digitizer tests the file on fabric similar to your intended apparel to ensure:
- clean stitching
- accurate outlines
- no thread breaks
- correct density
- tidy trims
This step makes a huge difference in quality.
Step 6: Receive Your Final Tajima File
The digitizer emails or uploads your completed file, ready to load directly into your machine.
Things to Consider Before Converting an Image to Tajima
To get the best stitching results, here’s what you need to keep in mind:
Size Matters
Tiny, detailed designs may not stitch well. Some details may need simplification.
Fabric Type Affects Digitizing
Different fabrics shrink, stretch, and react differently:
- Caps require structured stitching
- Polos need low-density
- Jackets can handle heavier fills
- Towels need special underlay
Let your digitizer know the fabric type for best results.
Not All Colors Translate
Threads have limits compared to digital color gradients. Some effects need to be converted into alternate embroidery techniques.
Thin Lines Should Be Converted to Satins
Very thin lines in artwork must be adjusted so they stitch cleanly.
Common Uses of Tajima Embroidery File Conversion
Tajima conversion is widely used across industries:
Corporate Uniforms
Left-chest logos, names, monograms.
Hats and Caps
Digitizing specifically for 5-panel and 6-panel caps.
Promotional Products
Tote bags, backpacks, giveaways.
Sportswear
Team logos, player names, patches.
Fashion and Custom Apparel
Jackets, hoodies, denim, accessories.
Patches and Badges
Laser-cut or stitched-edge patches.
If it’s stitchable, Tajima files make it possible.
Benefits of Professional Online Conversion
Here’s what you gain by choosing a specialized online digitizing service:
- Fast delivery
- High accuracy
- Machine-ready files
- Better stitching results
- Fewer thread breaks
- Optimized pathing
- Affordable and convenient
A well-digitized Tajima file helps your embroidery machine run smoother and faster.
Final Thoughts
Online image-to-Tajima conversion is one of the easiest ways to get clean, high-quality embroidery files without stress. A well-digitized file ensures smooth stitching, fewer issues, and a professional finish no matter what type of apparel you're embroidering.
If you’re looking for a reliable partner to handle your digitizing needs quickly and accurately, Digitizing Buddy consistently delivers crisp, machine-ready Tajima files designed for perfect stitching every time.
إعلان مُمول
إعلان مُمول
الأقسام
- AI
- التصميم
- Fashion and Art
- Investment and Finance
- Top 10
- Christianity
- Climate and Enviroment
- Writing and Film
- Fitness
- Food
- الألعاب
- Gardening
- Health
- Home and Interiors
- Marketing and Sales
- Music
- Making Money Online
- Others
- Books
- Religion
- Ecommerce
- Sports
- Cars
- Wellness
- Tech Gadgets
- المناسبات
- Governments and Nations
- Science and Engineering
- Real Estate
- Travel, Tourism and Hospitality
- التعليم
- Startups
- Beauty and Cosmetics
- Agriculture
- Computer Operating Systems
- Crypto
- Politics and News
- Video Review
- Immigration
إقرأ المزيد
Custom greaseproof paper is one of the solutions that are important to businesses to uphold the importance of good food packaging. The greaseproof paper sheet would help to preserve the food and make it presentable without unwanted grease spots in bakeries to restaurants. Such options as designed printed greaseproof paper and printed greaseproof paper sheets are also available to businesses to...
Key Drivers Impacting Executive Summary Sarcoma Drugs Market Size and Share Data Bridge Market Research analyses that the sarcoma drugs market which was USD 1222.20 million in 2022, is expected to reach USD 2435.31 million by 2030, at a CAGR of 9.00% during the forecast period 2023 to 2030 Accomplishment of maximum return on investment (ROI) is one of the most wannabe goals for any...
Big Data as a Service Market Report Overview: The aim of MMR's Big Data as a Service Market report is to assist clients in making informed business decisions. This involves identifying areas that require improvement, recognizing already successful sectors, and aiding newcomers in navigating and establishing a competitive presence. Additionally, the report sheds light on the...

Data Bridge Market Research analyses that the Retort packaging market is expected to reach the value of USD 2,074.15 million by 2029, at a CAGR of 5.6% during the forecast period. The global business landscape is undergoing a transformation, with industries increasingly leaning on deep research and actionable insights to make strategic decisions. One segment seeing tremendous traction is...
This Mexico Chemical Distribution market report has been prepared by considering several fragments of the present Mexico Chemical Distribution market and upcoming market scenario. The market insights gained through this market research analysis report facilitate a clearer understanding of the market landscape, identify potential future disruptions, and outline ways to position brands...